Tuesday, July 31, 2012

Launch of "Tiny Treasures By Teacher Tava" at the Teachers Pay Teachers Store


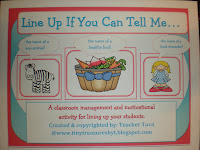
For all of my teacher friends, you might like to check out these three sets of Lining Up Activities that I just posted on TPT (great for grades K, 1, & 2).  These activities are especially helpful for the beginning of a new school year when procedures are being taught.  Let's face it, how many times a day do we have our students line up?  Why not add a little fun in lining up for bathroom breaks, lunch, special area classes, etc.   Each set contains 20 Lining Up Activity Cards that you can print, laminate, cut, and use year after year.  August is here-Hope you have a great start to a new school year!  If you join my blog and leave a comment about these Lining Up Activities,  I will electronically send this first set, "Line Up If You..." to you for FREE!  Either leave your email address in your comment or email me: tavteach@gmail.com so that I can send you the FREEBIE! 


You could either place these cards on a round ring or pull out of a container.


These last two sets of Lining Up Activities also contain 24 Writing Cards, which allow you to integrate the Lining Up Cards into Writing and other classroom activities.


Wednesday, July 18, 2012

Happy 3rd Anniversary To Us!


On July 20th, 2009, we were married in beautiful Lake Tahoe, California.  These scrapbook pages are from our wedding album (my favorite album that I have scrapped thus far!) I bought this plain ablum and added the ribbon, blue beads, and monogram tag.   There are 42 pages in the ablum.  Here are some of my favorites!  Above on the right is the first page of the album.   Below, I even included the hair pins that kept my curls up! Look closely at the borders of the hair pictures!


The picture on the right is the last page of the album!  We cannot wait to go back there someday! 


Monday, July 16, 2012

Spaghetti Lasagna

This is a family favorite!  I am not sure where the recipe came from, but it is definitely worth sharing.
This dish is great reheated...I am not a fan of leftovers, but this Spaghetti Lasagna is an exception! 

Grocery List: 
1/2 -1 Box of Spaghetti Noodles (Use 1/2 box for less noodles, and 1 whole box for more noodles)
1 16 oz. Cottage Cheese
1 lb. Bob Evans or Tennessee Pride Rolled Sausage (Sage Flavor)
1 26 oz. Jar of Spaghetti Sauce (any flavor, I used Tomato and Basil)
1 egg
4 tbsp. Butter (melted)
1/2 cup Parmesan Cheese
1 8 oz. Bag of Mozzarella Cheese
Garlic Salt or Regular Salt (optional)
Olive Oil
                                                         
1.  Cook noodles according to box directions. Add 1 tbsp olive oil into boiling water with noodles.  Add pinch of garlic salt or regular salt if desired into boiling water as well.
  2. While the noodles are cooking, go ahead and brown the sausage in an electric skillet.  Chop the sausage up into tiny pieces. Place sausage on paper towel to drain.  Set aside.
 3.  Drain cooked noodles.  Add one egg, 1/2 cup parmesan cheese, and 4 tbsp. melted butter to the noodles.  Stir well.  Place the noodles in a 9 X 13 inch pan. 
 4.  Create a well in the middle of the noodles and spread the 16 oz. cottage cheese.
 5.  Place the drained sausage on the top of the cottage cheese.
 6.  Pour the Spaghetti sauce over the top of the sausage.
 7. At this point, cover the dish with foil and bake in the oven at 325 degrees for 20 minutes. Then, remove foil, spread the mozzarella cheese on top, and bake for 10 more minutes.

 8. Finally, you have the final product-yum!  Serve with a salad, side dish of broccoli, and corn muffins.  Enjoy!


Friday, July 13, 2012

High Heel and Martini Glass Cupcakes

These cupcakes were made for my cousin Ali's bachelorette party.


 I used my Cricut Cake to create the gum paste high heel and martini glass shapes.  (A huge thank you to my friend, Jennifer, for letting me borrow these two Cricut cartridges)
                               I love this machine!

  I brushed a little shortening and sprinkled white crystal sprinkles onto the shapes.
    All of the cupcakes were filled with raspberry filling. 
    I added shaved chocolate to the high heel cupcakes.
 Green, pink, and white colored beaded sprinkles were added to the martini glass cupcakes.

Thursday, July 12, 2012

Enjoy Life's Simple Pleasures Chipboard and Paper Bag Album

Front Cover

Paper Bag pocket on left with tags for pictures and journaling

                     I love the colors in this album!


More tags to go in paper bag pocket on the right
                                      Back cover